Recent blog posts
Pete Eamsuwan • 12/28/2022
Your bundle size matters
Reduce your JS bundle size to improve user experience
Webpack configuration is one of the things that I had taken for granted since I started my web development journey (my background was in backend, so I rarely touch frontend configurations). It is something that you only have to configure once, and if you have done it correctly, you usually don't have to touch it again. It is not until I started this blog that I have started paying attention to what the configuration actually does and what impact it has on performance and user experience.
A larger JavaScript bundle can take longer to download, which can result in a slower loading time for your application. This can be frustrating for users, and may even cause them to leave your site if it takes too long to load.
Let's explore some tweaks you can easily do to your configuration to dramatically reduce your js bundle size and/or improve your website's load time.
GZip compression
The first time I built the static assets for deployment, I was presented with this message:
WARNING in asset size limit: The following asset(s) exceed the recommended size limit (244 KiB).
This can impact web performance.
Assets:
  js/bundle.55cf82631abc91f34661.min.js (1.98 MiB)
OK... thats pretty big. This led me to do some research about Gzip compression, and that's when I learned that it is uncommon for minified JS files to be served uncompressed, as modern browsers typically support Gzip compression.
Let's add Gzip plugin and see how much the bundle size can be improved. In the plugins section of your webpack configuration, add the following.
plugins: [
  ...
  new CompressionPlugin({
    algorithm: 'gzip',
    test: /.js$|.css$/,
  }),
  ...
],
I re-ran the build, and I was presented with:
WARNING in asset size limit: The following asset(s) exceed the recommended size limit (244 KiB).
This can impact web performance.
Assets:
  js/bundle.55cf82631abc91f34661.min.js (1.98 MiB)
  js/bundle.55cf82631abc91f34661.min.js.gz (523 KiB)
Four times smaller, now we're cooking with gas. Definitely not perfect, but an improvement.
Choosing the right modules
Next, we need to analyze our package.json dependencies to see if there are any modules that are causing our bundles to become too large. Fortunately, there is a website called BundlePhobia that can help us with that.
When I used BundlePhobia to scan my package.json, it highlighted some interesting issues:
- react-bootstrap size comes in at 113.7kb (minified), 36.7kb (minified + gzip)
- moment.js size comes in at 290.4kb (minified), 72.1kb (minified + gzip)
After some thoughts, I came to the following conclusions:
- remove react-bootstrap, because I'm already using bootstrap scss
- changed moment.js to day.js, a lighter weight library that does pretty much the same thing
After making the above changes and re-running the build, the sizes have come down to:
WARNING in asset size limit: The following asset(s) exceed the recommended size limit (244 KiB).
This can impact web performance.
Assets:
  js/bundle.74aa3bdc43110058c6aa.min.js (1.69 MiB)
  js/bundle.74aa3bdc43110058c6aa.min.js.gz (451 KiB)
Not great, not terrible.
Let's see if we can do better.
Only importing what you need
At this point I would like to introduce you to a Webpack's plugin called BundleAnalyzerPlugin. This will help us pinpoint where the bloat in our JS bundle is coming from.
To add it to your application, run
yarn add -D webpack-bundle-analyzerconst BundleAnalyzerPlugin = require('webpack-bundle-analyzer').BundleAnalyzerPlugin;
...
plugins: [
...
new CompressionPlugin({
algorithm: 'gzip',
test: /.js$|.css$/,
}),
new BundleAnalyzerPlugin(),
...Build your static assets, and the plugin will report what your bloat consists of.
Initially, I was surprised to see that 35% or 124kb (minified + gzip) of the size actually came from my scss/css files! Then it hit me that I had done
@import '../../../node_modules/bootstrap/scss/bootstrap.scss';So I went back and selectively imported only the bootstrap components that I actually needed, for example:
@import '../../../node_modules/bootstrap/scss/functions';
@import '../../../node_modules/bootstrap/scss/variables';
@import '../../../node_modules/bootstrap/scss/maps';
@import '../../../node_modules/bootstrap/scss/mixins';
...
@import '../../../node_modules/bootstrap/scss/utilities/api';
@import '../../../node_modules/bootstrap/scss/pagination';
...
Rerunning the bundle analyzer showed that the scss asset size went down from 125kb (minified + gzip) down to 72kb (minified + gzip).
WARNING in asset size limit: The following asset(s) exceed the recommended size limit (244 KiB).
This can impact web performance.
Assets:
  js/bundle.7ec103a7da3596fcf355.min.js (1.37 MiB)
  js/bundle.7ec103a7da3596fcf355.min.js.gz (399 KiB)
Getting better!
Extracting CSS/Minimize CSS
At this point, about 25% of the bundle size is still the css assets. Let's see if we can optimize this further.
Extracting CSS
By default without any additional Webpack's configuration, CSS are automatically inlined into the bundled JS files. This has some disadvantages:
- Visitors of the site may experience Flash of Unstyled Content (FOUC), due to the CSS being loaded only after the content has already been rendered (because the CSS is coupled with the JS files)
- CSS cannot be loaded in parallel, which hurts the overall performance of the site. By keeping them separate, the browser can start rendering the page as soon as the CSS is available, rather than waiting for the entire JavaScript bundle to download and execute.
Let add the CSS extractor and the CSS Minimizer plugin to our Webpack's configuration:
const MiniCssExtractPlugin = require('mini-css-extract-plugin');
const CssMinimizerPlugin = require('css-minimizer-webpack-plugin');
...
module: {
    rules: [
      {
        test: /\.(scss|sass)$/,
        use: [MiniCssExtractPlugin.loader, 'css-loader', 'sass-loader'], // Note: MiniCssExtractPlugin's loader sits in-place of the style-loader
      },
    ],
  },
...
optimization: {
  minimize: true,
  minimizer: [new CssMinimizerPlugin(), '...'],
},
...
plugins: [
  ...
    new MiniCssExtractPlugin(),
  ...
  ],
Rerunning the build and the analyzer will show that the css assets are no longer part of the bundled js, and the bundle size has been brought down to:
WARNING in asset size limit: The following asset(s) exceed the recommended size limit (244 KiB).
This can impact web performance.
Assets:
  js/bundle.9823fae9f9c86ef89e74.min.js (985 KiB)
  js/bundle.9823fae9f9c86ef89e74.min.js.gz (326 KiB)
Code splitting
Webpack's code splitting feature allows you to divide your code into smaller bundles that are loaded as needed, rather than all at once when the application initially loads. This can enhance the performance of your application by shortening the initial load time, as the browser only has to load the bundles required for the initial rendering of the page, rather than the entire codebase.
The feature is incredibly powerful as it also allows for a shorter load time when the website is updated, as the browser will only need to load the bundles that have been changed, rather than the whole monolithic bundle as would be the case with no code splitting. Here we will explore this concept.
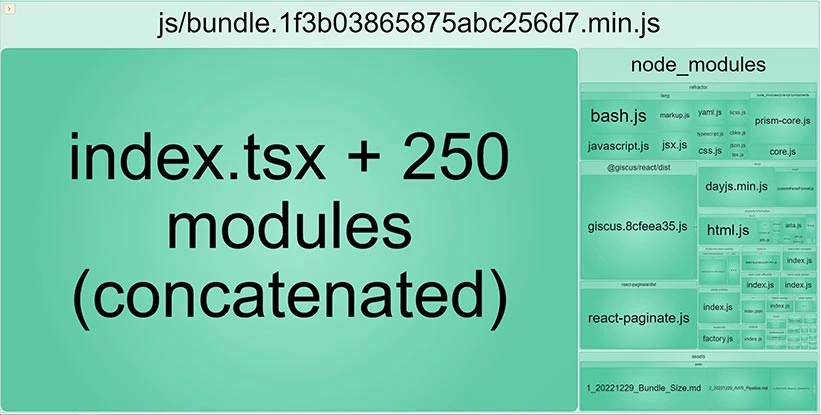
Before we embark on the journey of splitting our js bundle, let's start by observing the current state of our monolithic bundle.

We can see that the bundle composes of the following:
- Our site's react code
- Node modules
- Assets (blog posts in markdown format)
All of these assets belonging in a single bundle has a certain implication; if any of the following change:
- The site's react code.
- New article added.
- Dependencies updated.
Then the users' browsers will have to re-download the entire monolithic bundle, rather than just the component that has changed.
Splitting node modules
It's obvious that if our site's react code has changed, we wouldn't want to make users also re-download unchanged node modules dependencies. To avoid this happening, we can use Webpack's configuration called splitChunks.
optimization: {
    splitChunks: {
      chunks: 'all',
      maxInitialRequests: Infinity,
      minSize: 10000,
      cacheGroups: {
        vendor: {
          test: /[\\/]node_modules[\\/]/,
          name(module) {
            return `npm.${module.context
              .match(/[\\/]node_modules[\\/](.*?)([\\/]|$)/)[1]
              .replace('@', '')}`;
          },
        },
      },
    },
    ...
}
Let's go through the above configuration, part by part:
optimization: {
    splitChunks: {
      chunks: 'all',
      ...
    }
  ...
  }
Providing
alloptimization.splitChunks.chunks ...
maxInitialRequests: Infinity,
...maxInitialRequests ...
minSize: 10000,
...minSize ...
cacheGroups: {
vendor: {
test: /[\\/]node_modules[\\/]/,
name(module) {
return `npm.${module.context
.match(/[\\/]node_modules[\\/](.*?)([\\/]|$)/)[1]
.replace('@', '')}`;
},
},
},
...cacheGroupsThe
vendornode_modulesWe provide the Regex for the
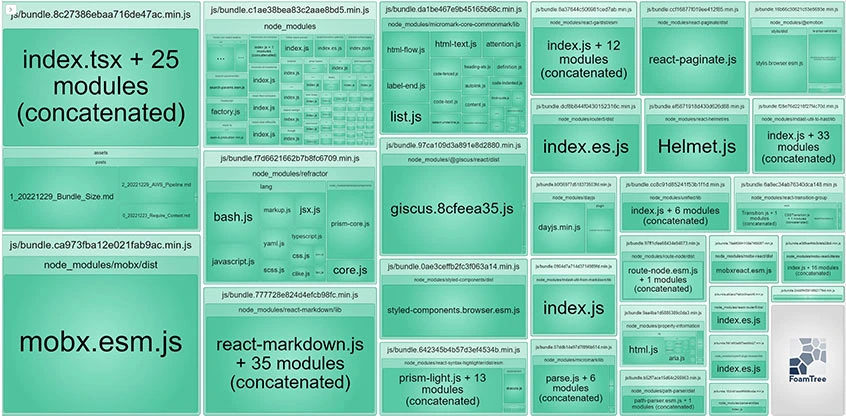
node_modulestestnameWith this new configuration added, rerunning the bundle analyzer gives us the following result.

Nice! We can see that our bundles are no longer monolithic, the larger dependencies are broken up into chunks, and the smaller ones are grouped into larger chunks to reduce HTTP overhead.
Splitting volatile components
Splitting out volatile components in your bundle can help improve subsequent load time for your site, as the browsers will only need to load the updated components, not the unchanged cached components.
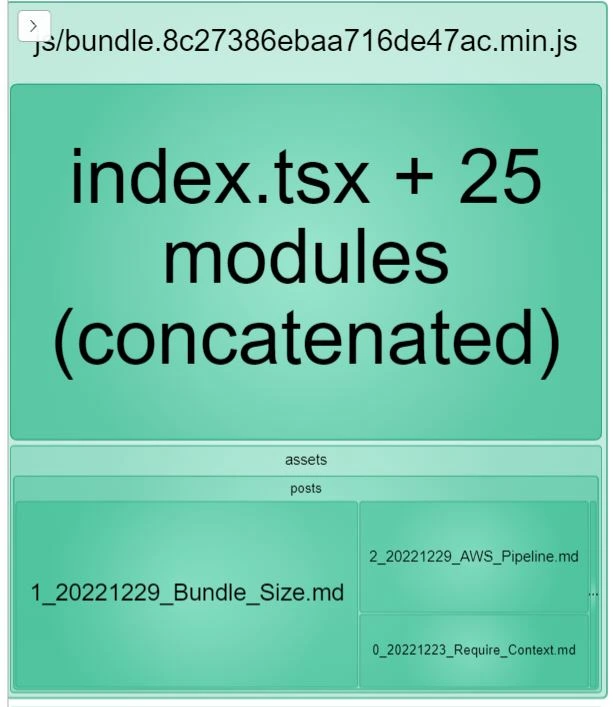
Let's observe the main bundle where our react code resides.

Here we see that our blog posts (markdown files) are part of the main bundle. Because this is a blog application, these posts are the most volatile components of the system.
The rest of the system:
- Search functionality
- Menu
- Navigation
- Banner
- State management
Will not change nearly as often as new blog posts are being added. Hence it makes sense for these blog posts to be split from the main bundle, so when a new blog post is added, the browser will only need to load the new post, and retrieve any other components from the cache.
Luckily, Webpack 5 automatically splits out any async dependencies into their own chunks. In additional, the
require.contextlazyconst markdownContext = require.context('../assets/posts', false, /\.md$/, 'lazy');
...
const getModules = (context: __WebpackModuleApi.RequireContext) => context.keys().map(context);
const markdownModules: BlogPostModel[] = (await Promise.all(
getModules(markdownContext),
)) as BlogPostModel[];Alternative to splitting out volatile components, using webpack's cacheGroups
In the previous section, we learned about splitting out components by asynchronously loading them at runtime. However, managing async components can be challenging from a user experience perspective, as it may be necessary to display a loading spinner or message while the content is being loaded.
An alternative approach to optimizing performance on subsequent visits is to use webpack's
cacheGroupscacheGroupHere's an example of how to do this in the webpack configuration:
optimization: {
    splitChunks: {
      ...
      cacheGroups: {
        posts: {
          minSize: 0,
          test: /assets[\\/]posts[\\/](.+)\.md/,
          name(module) {
            return `${module.resource
              .match(/(.*)assets[\\/]posts[\\/]([^\\/]+)\.md$/)[2]
              .replace('_', '')}`;
          },
          chunks: 'all',
        },
        ...
      },
    },
    ...
  },
With this configuration, we have created a new cacheGroup called
postsminSize: 0Results
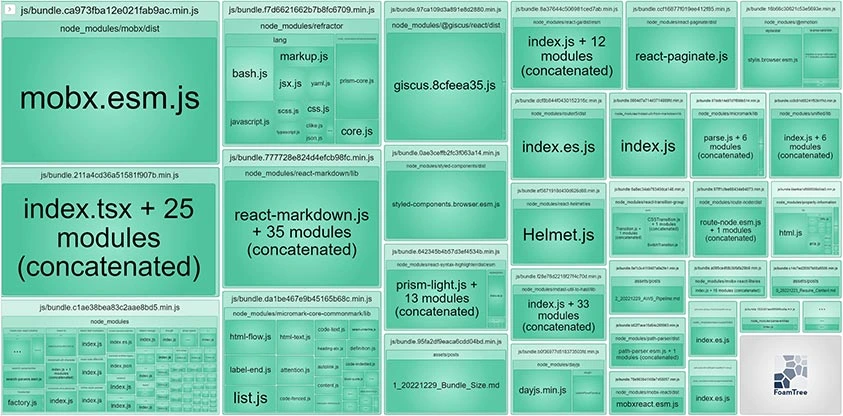
Let's rerun the bundle analyzer and the build to see the impact:

We can see that the markdown files have been split out into their own bundles and running the build has shown that the warning on the file size has totally disappeared! Nice!
Inspecting the js bundle shows that the largest js file is only 14.55KB (minified + gzip, mobx dependency) which is a massive improvement from the initial non gzip size of nearly 2MB and gzip size of 500Kb.
If you are interested in seeing this work in action, please checkout the source code at my github repo.