
Pete Eamsuwan · April 3, 2023 · 14 min
Dissecting OAuth2, with Github
Learn more about OAuth2 and how to use it to access protected resources on github.
So you have created a shiny new application with a basic Email/Password authentication/authorization, and you want to add a "Sign In with Github" button to it (or something similar with Google/Microsoft etc). How would you go about doing it?
To achieve this, it's best that we understand the OAuth2 specification and how it works. In this article, we will be dissecting OAuth2 Authorization Code flow, with Github. I will be referencing the OAuth2 source material from time to time, by Internet Engineering Task Force (IETF, sounds cooler when it's not abbreviated doesn't it?), namely the RFC 6749: The OAuth 2.0 Authorization Framework
But why not use OAuth 2.1?
Because OAuth 2.1 is still a work in progress. Once it is officially released, I'll be covering the Proof Key for Code Exchange that would be required for all clients using the Authorization Code Flow.
OAuth 2 Protocol Refresher
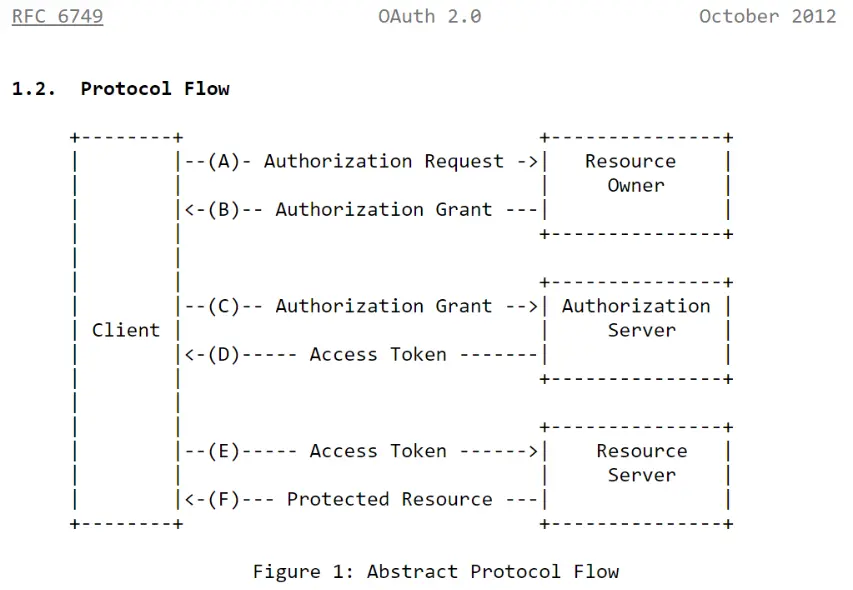
The diagram above describe the high level interaction between four roles involved in the OAuth Protocol, note the following:
- The "Client" is the entity that is requesting the authorization to access the protected resource. Nowhere in the OAuth specification does it say that the Client must be a javascript code running in the browser or the web server, it could be either, both, or something else entirely.
- Note that OAuth specification makes a very clear distinction on Resource Owner, Authorization Server, and the Resource Server. Note that these are logical abstractions, not necessary a physical one.
- Note that the OAuth specification makes a very clear distinction on the Authorization Grant vs Access Token.
- Nowhere in the spec did they mention JSON Web Tokens (JWT), that's implementation detail.
Implicit Flow
Implicit flow is a simplified authorization flow optimized for clients and implemented in a browser (read: no backend). Instead of issuing the client Authorization Code, the client is issued the Access Token directly. The access token is returned directly to the client as a result of the redirect and is exposed to the client side code which could be potentially intercepted. Because of said security vulnerability, we won't be digging deeper into the implicit flow.
Authorization Code Flow
Authorization Code Flow (or "Web Server Flow") is more secure and the recommended approach for OAuth 2.0 authentication, in fact, it follows exactly what the Abstract Protocol Flow described without any simplification.
With this flow, the user is directed to the authorization server. Should their authentication be successful, they will be redirected back with the authorization code. The authorization code is then sent back to the backend and the backend uses it to request the access token. With the access token, access to the protected resource is possible.
As you can probably see, the access token exchange is done server to server and thus (with proper TLS encryption) can't be intercepted.
B...B..But what if the authorization code is intercepted?
The attacker won't be able to do much because:
- The authorization code is generally short lived, OAuth specification recommends the MAXIMUM of 10 minutes lifespan.
- The authorization code can only be used once, based on the specification, code re-use MUST result in access token denial (from the Authorization Server), and if possible SHOULD revoke all access tokens issued by that authorization code.
- The attacker won't have access to the
client_secretthat is stored server side, said secret is used during the access key exchange.
Putting the theory to work, with Github
So by now you probably have a rough idea of how OAuth2 flow works, so let's tinker around with Github OAuth endpoint to see how we can use it to get user data.
Setting up Github OAuth Apps
First step, we need to setup a new OAuth App with Github, navigate to the following link -> OAuth Apps -> New OAuth App. Fill out the following details:
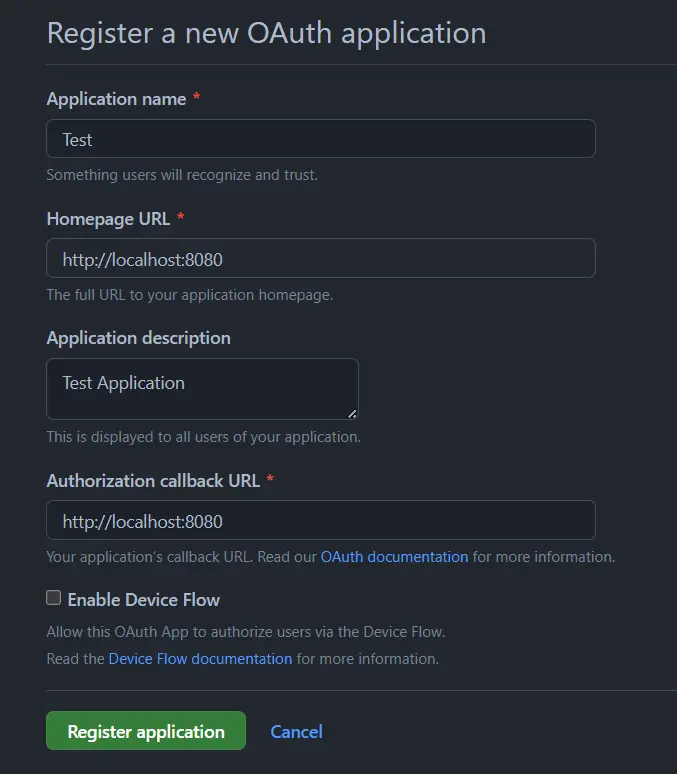
Take note that the Authorization callback URL is the URL that the user will be redirected to after they have completed the Authorization Request <-> Authorization Grant flow.
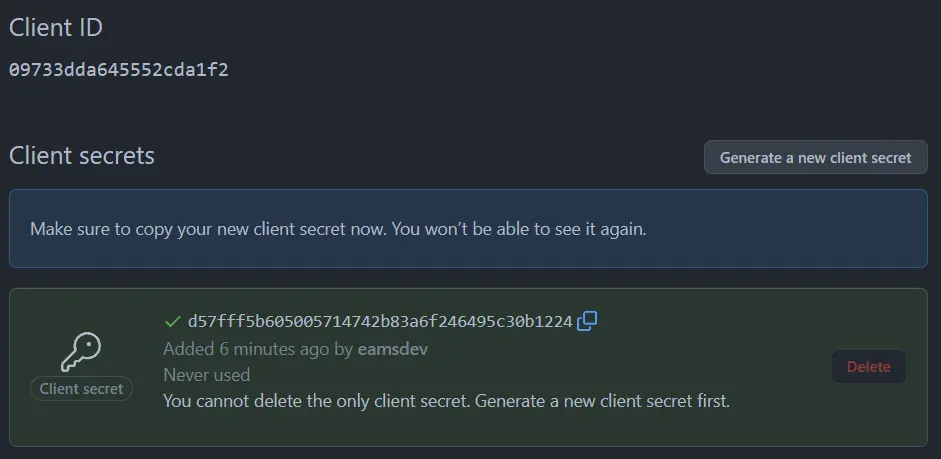
Submit the form then generate a new client secret:
Authorization Request/Grant
Right now we have all the information that is required to make the Authorization Request, so let's do it.
Based on section 4.1.1. Authorization Request of the OAuth specification some of the following parameters are required.
response_type:code, because we are using the Authorization Code Flow. (interestingly, based on Github documentation, this is not required)client_id: The client identifier that we have retrieved from Github after creating a new OAuth App- Optional
scope: the access scope, leaving this blank means you will only have access to public information in the case of Github. - Few other optional parameters, consult Github docs if you would like to know more.
From this link it seems that Github OAuth address is at https://github.com/login/oauth/authorize.
So our Authorization Request should look like the following (at the minimum): https://github.com/login/oauth/authorize?client_id=09733dda645552cda1f2,let's fire up the browser and navigate there:
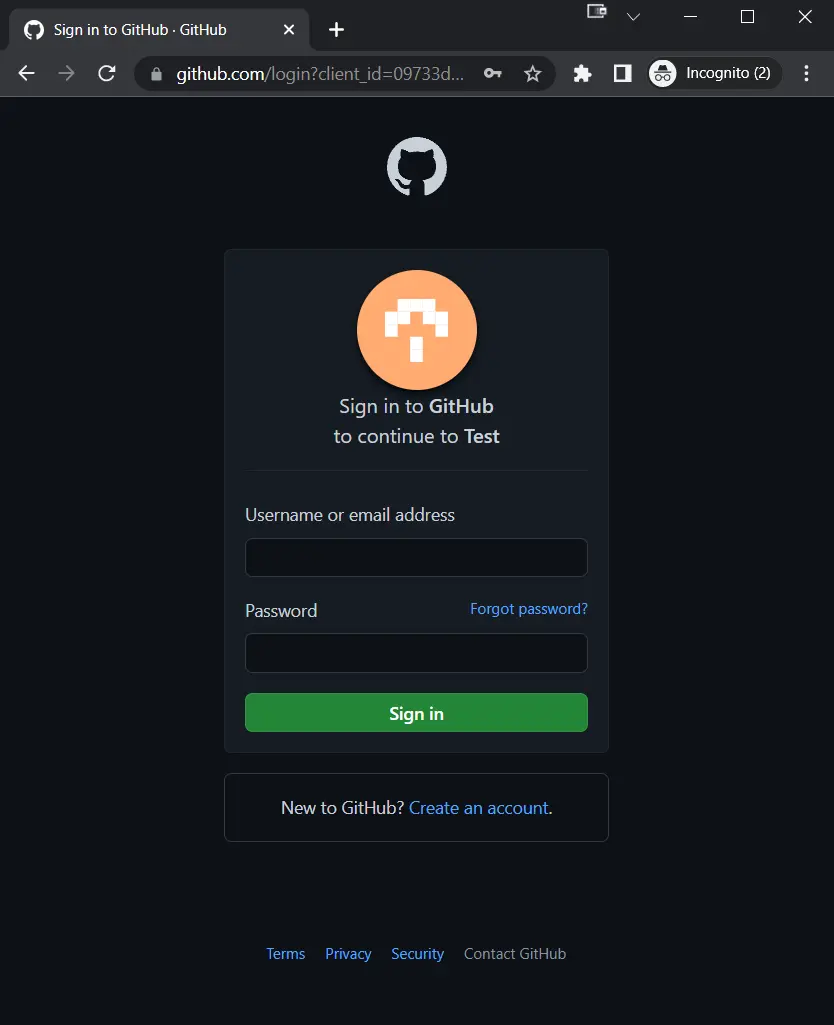
Awesome! we got the Github login screen, and it's showing the name of the application, "Test" that I registered earlier. Let's enter the credentials and login.
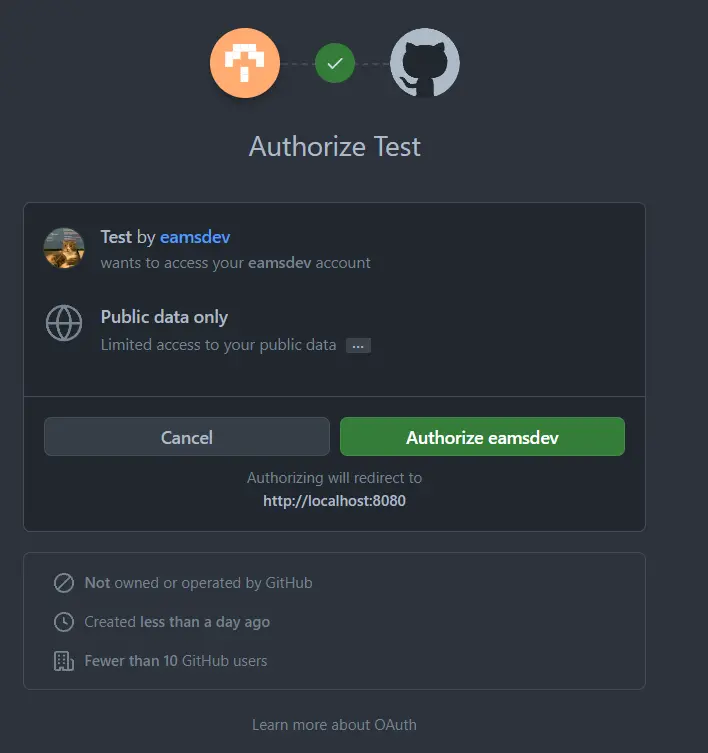
Exactly what we expected, because we did not provide the scope, the application is only authorized to use public data, let's authorize it.
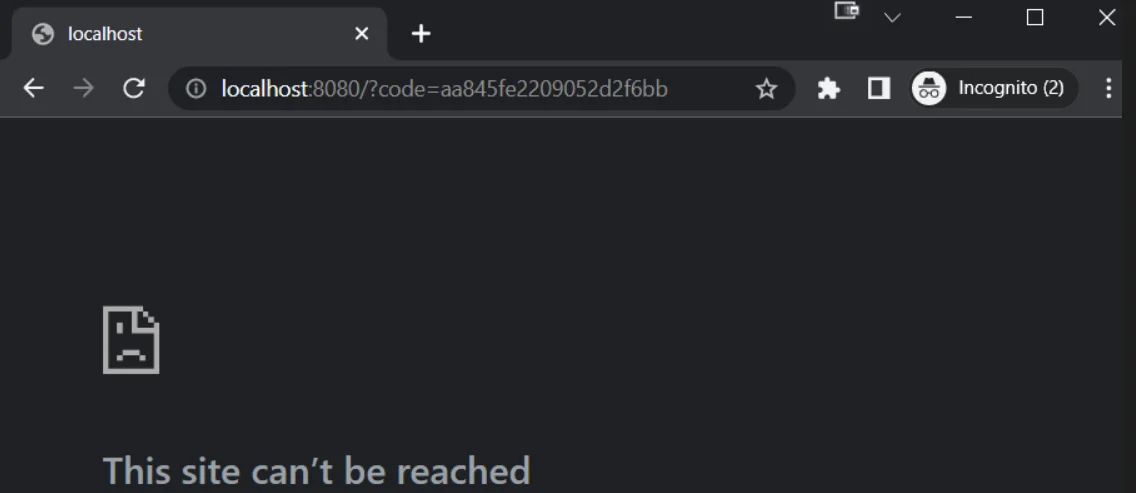
Interesting, after authorizing the Test application, I get redirected to localhost:8080?code=aa845fe2209052d2f6bb, but why? Well it is because:
- We have registered the redirect URL as
localhost:8080when we set up the application, and as I mentioned earlier, this is the URL that you will be redirected to after you have authorized the application. - The
codequery parameter is actually our Authorization code! We can use this along withclient_idandclient_secretto get ouraccess_token
Retrieving the Access Token
Without further adieu, let's try get the access_token. Based on section 4.1.3. Access Token Request (I know that you can just consult Github's documentation, but I think it is interesting to find out how Github implementations of OAuth2 line up with the actual specification), some of the following parameters should be included:
code: authorization code received from the previous stepclient_id: the sameclient_idwe used earlier, provided by Githubclient_secret: this is required based on the description in 3.2.1. Client Authentication and section 2.3.1. Client Password, we got this secret from Github.grant_type: query parameter must be set toauthorization_code(interestingly, based on Github documentation, this is not required, it's not mentioned at all even)- Few other optional params, specifically for Github (docs).
In addition to the above, Github has mentioned in their documentation that the request has to be a POST to https://github.com/login/oauth/access_token
So let's spin up Postman and set up our POST request, and post it:
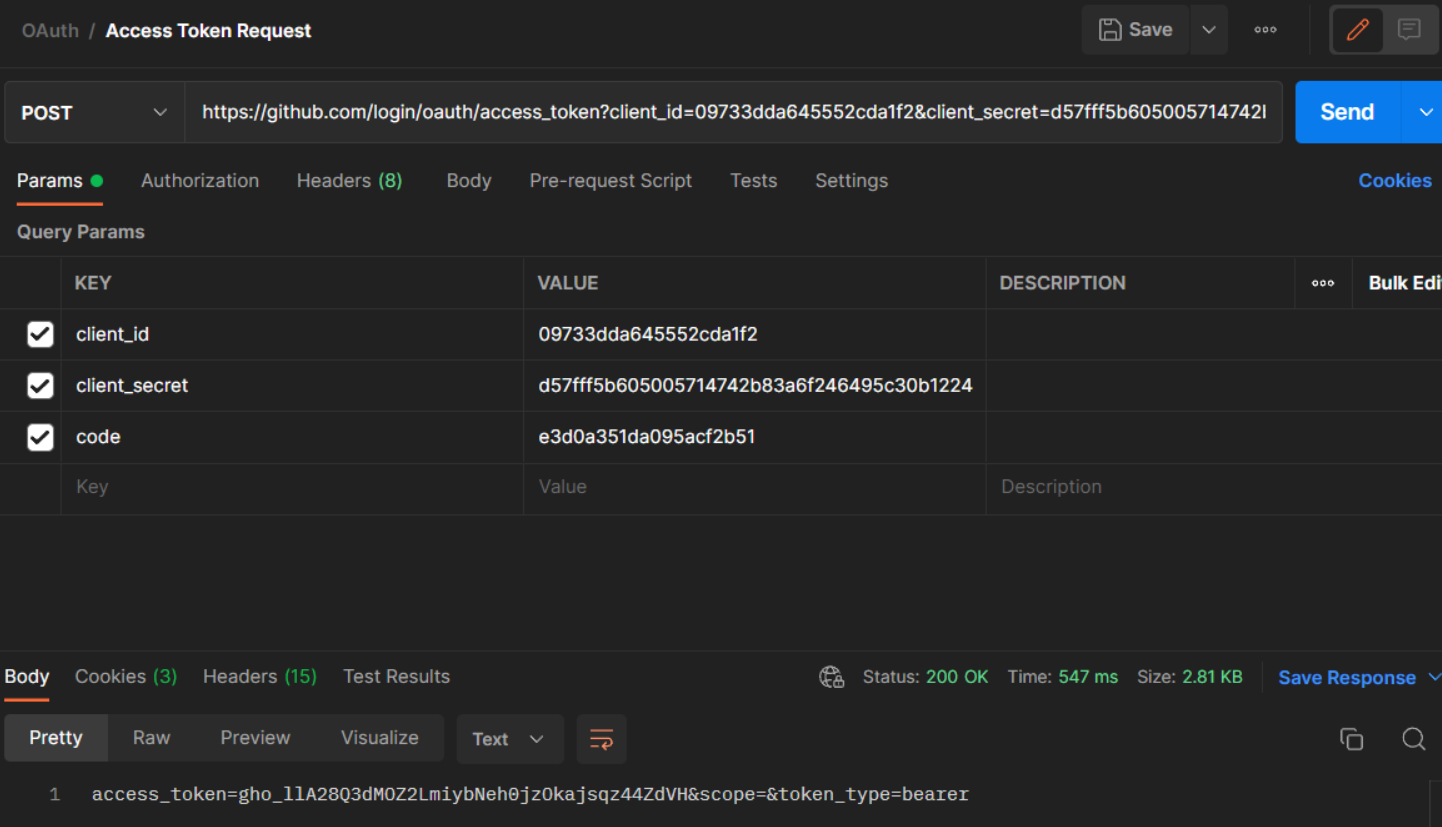
Hooray! We got the access token!
Using the Access token to retrieve the Protected Resource
Let's try to use it to hit the API:
C:\Users\po-ea>curl -H "Authorization: Bearer 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" https://api.github.com/user
{
  "login": "eamsdev",
  "id": 76290232,
  "node_id": "MDQ6VXNlcjc2MjkwMjMy",
  "avatar_url": "https://avatars.githubusercontent.com/u/76290232?v=4",
  "gravatar_id": "",
  "url": "https://api.github.com/users/eamsdev",
  "html_url": "https://github.com/eamsdev",
  "followers_url": "https://api.github.com/users/eamsdev/followers",
  "following_url": "https://api.github.com/users/eamsdev/following{/other_user}",
  "gists_url": "https://api.github.com/users/eamsdev/gists{/gist_id}",
  "starred_url": "https://api.github.com/users/eamsdev/starred{/owner}{/repo}",
  "subscriptions_url": "https://api.github.com/users/eamsdev/subscriptions",
  "organizations_url": "https://api.github.com/users/eamsdev/orgs",
  "repos_url": "https://api.github.com/users/eamsdev/repos",
  "events_url": "https://api.github.com/users/eamsdev/events{/privacy}",
  "received_events_url": "https://api.github.com/users/eamsdev/received_events",
  "type": "User",
  "site_admin": false,
  "name": "eamsdev",
  "company": null,
  "blog": "https://eams.dev",
  "location": "Melbourne",
  "email": null,
  "hireable": null,
  "bio": null,
  "twitter_username": null,
  "public_repos": 12,
  "public_gists": 0,
  "followers": 0,
  "following": 1,
  "created_at": "2020-12-20T09:16:20Z",
  "updated_at": "2023-03-30T04:53:21Z"
}
Which returns the "protected" resource from the resource server, not that these are all public information, because I left the request scope empty in the Authorization Request. To access private resources, you will need to provide the scope parameter. For example, in the case of user's email, for Github you will need to provide ...&scope=user:email in the query param. The scope parameter values will depend on the providers, you will need to consult their documentation (Github's Scopes)
For example, when repeating the above flow with addition user:email scope, Github will prompt me that the client application is requesting additional permissions:
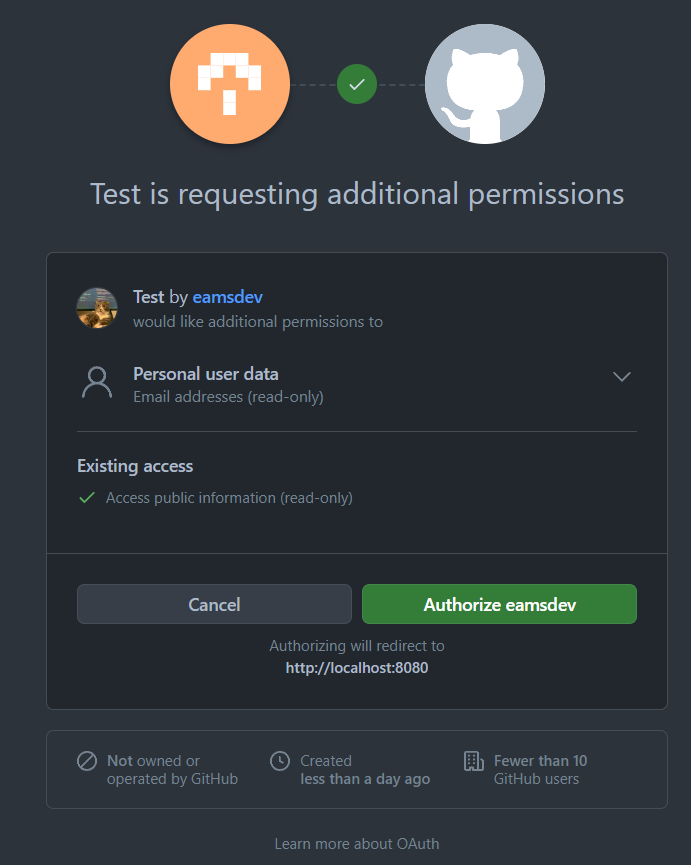
And with that you will get an Authorization Code that you can use to retrieve an Access Token to retrieve the user's email (different endpoint, as described by the docs):
C:\Users\po-ea>curl -H "Authorization: Bearer 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" https://api.github.com/user/emails
[
  {
    "email": "XXXXXXXXX@gmail.com",
    "primary": true,
    "verified": true,
    "visibility": "private"
  },
  {
    "email": "XXXXXXXXX+eamsdev@users.noreply.github.com",
    "primary": false,
    "verified": true,
    "visibility": null
  }
]
Hope you find this article informative! In the next article (or next next) we will be looking at adding the actual Github authentication to a React/.Net application.