
Pete Eamsuwan · May 3, 2023 · 7 min
OAuth with .Net 6 and React
Learn how to authenticate users using OAuth for a .Net application with React frontend.
In the previous article we examined OAuth2 specification and how the Authorization Code flow could be used to authenticate users for your application. This article assumes that you have a basic knowledge of OAuth protocol, you can refer to the previous article for a refresher.
What we will be building
Let's consider the scenario where you have an existing React Dotnet application with some basic authentication mechanism, say Cookie Authentication. Users can register and sign in to your application via username/password combination and the users' information is stored in the database that you host yourself. Your application has noticeably gained popularity, and you would like to add additional sign-in mechanisms such as Github sign-in. Let's explore how you can do this.
Traditionally, with basic cookie authentication, the user creation/login flow could be:
- User registers an account
- A user is created by the application
- User signs in using the aforementioned account
- A cookie with claims containing the identity of the user is returned and stored by the browser
- Said cookie is sent on subsequent requests, and validated server-side to access protected resources
With OAuth, assuming that you won't be using OpenIdConnect, your user creation/login flow could be the following:
- User clicks on "Sign in with Github"
- The application redirects the user to Github's Resource Authorization page, where the user signs in and grants the application access to the user's profile
- Github redirects to the Authorization Callback url which passes the Authorization Code to the server
- The server exchanges the code for the access token
- With the access token, the server retrieves the user profile
- If said user exists, then the user is signed in (via a cookie)
- If the user does not exist, then the user is created and signed in (via a cookie)
- Said cookie is sent on subsequent requests, and validated server-side to access protected resources
As you can probably tell, the access token is short-lived, as we are only using it to access the user profile of the user logging in.
Configuring your .Net Web Api for OAuth
To register OAuth services, you can use the AddOAuth extension from Microsoft.Extensions.DependencyInjection.OAuthExtensions. Your configurations will largely be dependent on your use cases, however at the minimum you will need the following:
// Syntactic sugaring extension method
private static IServiceCollection AddAuth(this IServiceCollection services)
{
    services
        .AddAuthorization()
        .AddAuthentication(IdentityConstants.ApplicationScheme)
        .AddCookie(IdentityConstants.ApplicationScheme, ConfigureCookie)
        .AddCookie(IdentityConstants.ExternalScheme, ConfigureCookie)
        .AddCookie(IdentityConstants.TwoFactorUserIdScheme)
        .AddOAuth("Github", ConfigureGithub);
    return services;
}

private static void ConfigureGithub(OAuthOptions options)
{
    options.SignInScheme = IdentityConstants.ApplicationScheme;
    options.ClientId = "YOUR_CLIENT_ID_HERE";
    options.ClientSecret = "YOUR_CLIENT_SECRET_HERE";
    options.AuthorizationEndpoint = "https://github.com/login/oauth/authorize";
    options.TokenEndpoint = "https://github.com/login/oauth/access_token";
    options.UserInformationEndpoint = "https://api.github.com/user";
    options.CallbackPath = "/oauth/github-cb";
    options.ClaimActions.MapJsonKey(ClaimTypes.NameIdentifier, "id");
    options.ClaimActions.MapJsonKey(ClaimTypes.Name, "login");
    options.Events.OnCreatingTicket = GithubOAuthProvider.OnCreatingTicket;
}
Let's analyze the ConfigureGithub option configuration method, it sets the following:
SignInScheme, this could beApplicationSchemeorExternalSchemedepending on your use-cases. In my case, I use theApplicationSchemebecause I have no need to treat users who signed in via Github differently.ClientId, the client Id from Github OAuth App registrationClientSecret, the secret from Github OAuth App registrationAuthorizationEndpoint, the endpoint in which you redirect the user to sign in to Github and authorize the resource (user profile) for your applicationTokenEndpoint, the endpoint in which the server exchanges the Authorization Code for the Access TokenUserInformationEndpoint, the endpoint in which the server retrieves the user information using the Access TokenClaimActions.MapJsonKey, defines ClaimTypes mapping for Json data, we will see later how this becomes useful.Event.OnCreatingTicket, defines a custom action to execute when creating authentication ticket.
OnCreatingTicket Action
Let's analyze what we are doing before we issue the ticket and the user is signed in.
public static class GithubOAuthProvider
{
    public static async Task OnCreatingTicket(OAuthCreatingTicketContext ctx)
    {
        var username = await RetrieveUsername(ctx);
        using var userManager = ctx.HttpContext.RequestServices.GetRequiredService<UserManager<User>>();
        await SignIn(ctx,
            await TryGetExistingUser(userManager, username)
            ?? await CreateUser(userManager, username));
    }
The above method defines the OnCreatingTicket action, which we saw configured earlier in the OAuth options configuration. From the code, we are essentially doing 3 things:
- Get the internal username of the user attempting to login.
- Check whether said user exists
- If they exist, sign them in, otherwise create the user and sign them in.
But how do I retrieve the username? You will need to hit the user information endpoint as seen in the following code:
private static async Task<string> RetrieveUsername(OAuthCreatingTicketContext ctx)
{
    using var request = new HttpRequestMessage(HttpMethod.Get, ctx.Options.UserInformationEndpoint);
    request.Headers.Authorization = new AuthenticationHeaderValue("Bearer", ctx.AccessToken);
    using var getClaimResult = await ctx.Backchannel.SendAsync(request);
    ctx.RunClaimActions(await getClaimResult.Content.ReadFromJsonAsync<JsonElement>());

    try
    {
        var idClaim = ctx.Identity!.FindFirst(ClaimTypes.NameIdentifier);
        var loginClaim = ctx.Identity!.FindFirst(ClaimTypes.Name);
        var nativeLoginUsername = GenerateUserName(idClaim!.Value, loginClaim!.Value);
        ctx.Identity.RemoveClaim(loginClaim);
        ctx.Identity.AddClaim(new Claim(ClaimTypes.Name, nativeLoginUsername));
        return nativeLoginUsername;
    }
    catch (Exception)
    {
        throw new AuthenticationException();
    }
}
In the above code we are doing the following:
- Perform a get request to the user information endpoint, using the access token, to retrieve information about the user attempting to sign in.
- Map the claims to the context using the mapping we defined in the earlier section (the
ClaimActions.MapJsonKey) - Replace the original
ClaimTypes.Nameclaim with a custom made username, using a combination of the account-id and the login name. Note that this is not necessary and will depend on your business needs. - Return the username
Creation of user and signing them in is trivial, if you are interested in this part, check out the source code directly here at GithubOAuthProvider.cs
What about the front end?
The good news is, because the server manages the OAuth flow entirely and switches to cookie authentication once the user is signed in, no changes are technically required. This is because as far as the front end is concerned, the user who signed in using Github is no different to native users.
Seeing it work in action
The source code for this example can be found at my github repo, so feel free to clone it to test it yourself. The OAuth demo application contains a simple login screen where you can sign in with your github account.
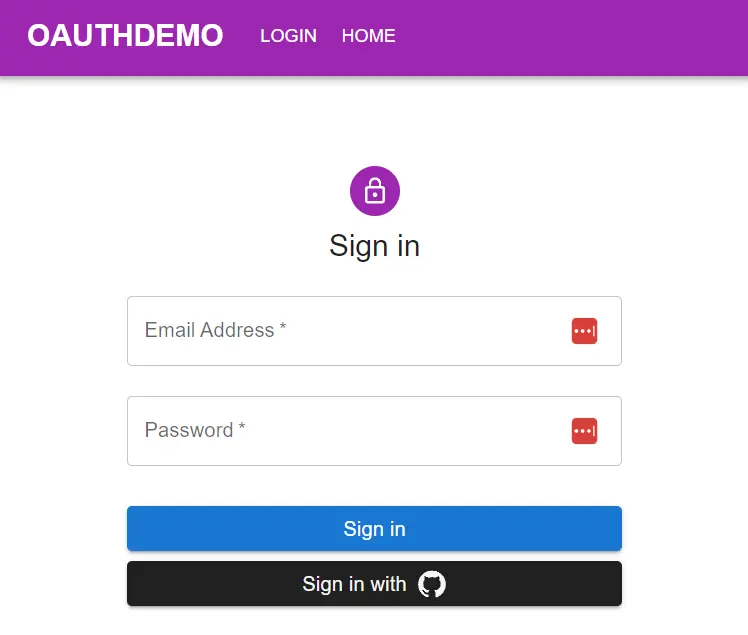
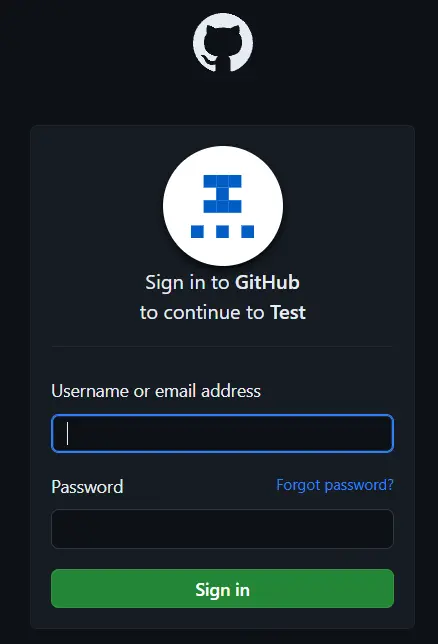
After clicking the sign-in button, you will be redirected to Github sign-in and authorization page.
After which you will be redirected back to the home page with your login name and account Id displayed.
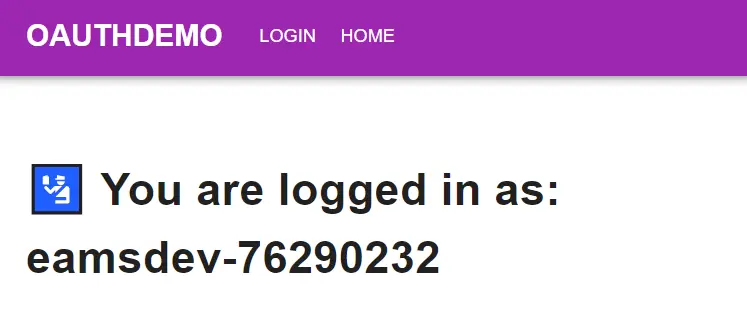
Pretty simple working example to demonstrate how one can integrate OAuth into their .Net/React application!
Concluding Remarks
In this article we explored how to add OAuth Authentication using Github to our .Net/React application. I hope you find it useful, if you are interested in checking out the source code, it can be found at my github repo